One of the areas that I stumbled upon was having to enable something during the process to take advantage of the new team’s functionality above so wanted to document that also.
Firstly, head on over to the download link posted in the blog linked above this post will also give you a short overview on what you can expect in v5.
Once you have that downloaded, you are good to close down the console and begin the upgrade process, advice here is to make sure all jobs are finished and nothing is scheduled for the next 10 minutes maybe longer depending on the size of the environment.
Run through the pretty simple next next upgrade process.
Then open the console and check you have the correct version. By heading here.
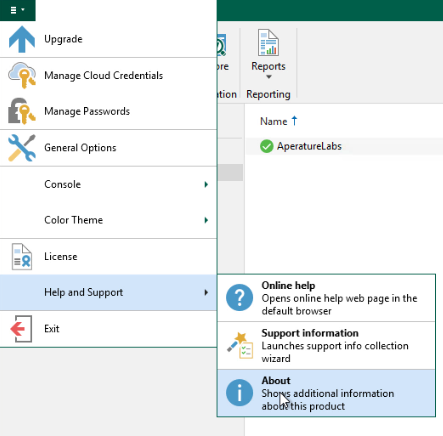
By selecting the about option, you are going to then see this following screen to show you your build number and version.
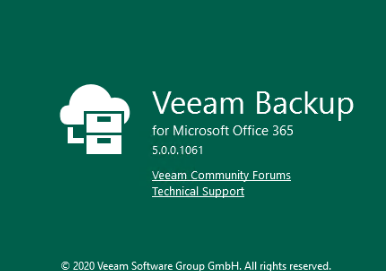
This shows we have successfully updated our server to v5 and we can start protecting those Microsoft Teams objects.
But before we can do that especially if you are an existing Veeam Backup for Microsoft Office 365 user then you will need to enable this option on the organisation.
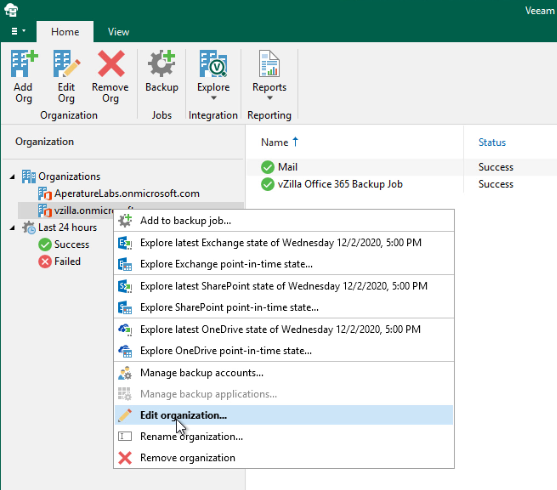
What you are going to find is that the Microsoft Teams check box is unselected, if you wish to protect this within the organisation then select that checkbox
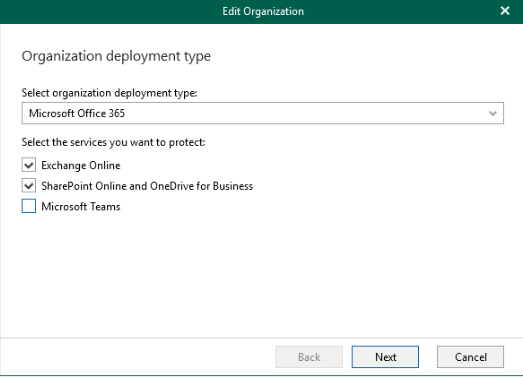
If you are a green field first time installation of Veeam Backup for Microsoft Office 365 and you are starting with v5 or newer, then when you add your organisation it is going to look like this.
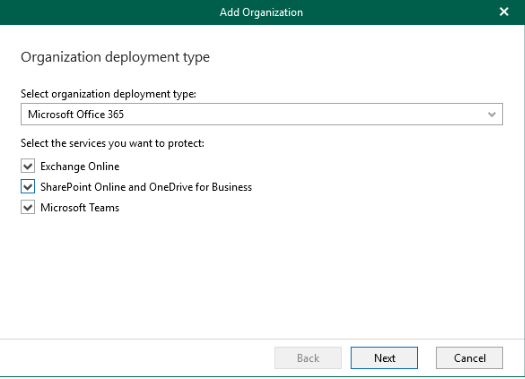
You can see there that this is automatically selected.
]]>As well as making things much faster when it comes to backing up the data but more importantly the granular recovery and speed of that recovery back into your Office 365 environment.
Microsoft Teams
Microsoft Teams data was already being protected when Veeam Backup for Microsoft Office 365 was protecting your SharePoint Online environment, however when it comes to recovery it wasn’t as nice and granular to perform those recoveries. There was a great post back in 2019 talking about this way of protecting Teams data and restoring by Veeam Vanguard Falko Banaszek.
Now with v5 we have a much better way to not only capture the Microsoft Teams data but also a much faster way to recover granular items with the new Veeam Explorer for Microsoft Teams functionality.
In terms of what granular levels of recovery can we get to, well this would include your team channels, settings, permissions as well as those files and data also stored within Microsoft Teams. Then there is also the search functionality being able to search across chat and files to find the objects you require for recovery. Then for the final step of the restore you can either just grab individual files or grab multiple files and chats and restore those back to Microsoft Office 365.
The one thing not possible is backing up those GIFs but I feel the internet has a big repository of these some place already.
Proxy placement and deployment
With every Veeam release there is always a focus on Performance and Scalability, this release of v5 is no different. The ability to leverage concurrent tasks with SharePoint backup making those backups faster, but also around proxies and scalability, the number of supported proxies for Veeam Backup for Microsoft Office 365 has been increased by something silly like 5 times.
Prior to this release as well the proxies that deal with the movement of data between Microsoft Office 365 and the repository location had to be joined to a trusted domain the same as the Veeam Backup & Replication server, for most cases this is fine but there are some environments where this is not possible or wanted. V5 brings around the ability to now deploy those proxies in a non-domain joined fashion. Not only that but the Veeam Backup for Microsoft Office 365 management server also does not need to be joined to a domain. This really does enable complete flexibility and scalability in those required environments.
Cloud Field Day – Demo Time
For those that know me and the Veeam Product Strategy team you know we don’t leave home without the ability to perform a live demo, especially when it comes to Cloud Field Day and big events like that. Back earlier in 2020 when we were able to do a session there, we decided to show off Veeam Backup for Microsoft Office 365 in general but also highlighting the features and functionality that have now arrived in v5 of the product.
You can see that demo below.
Free
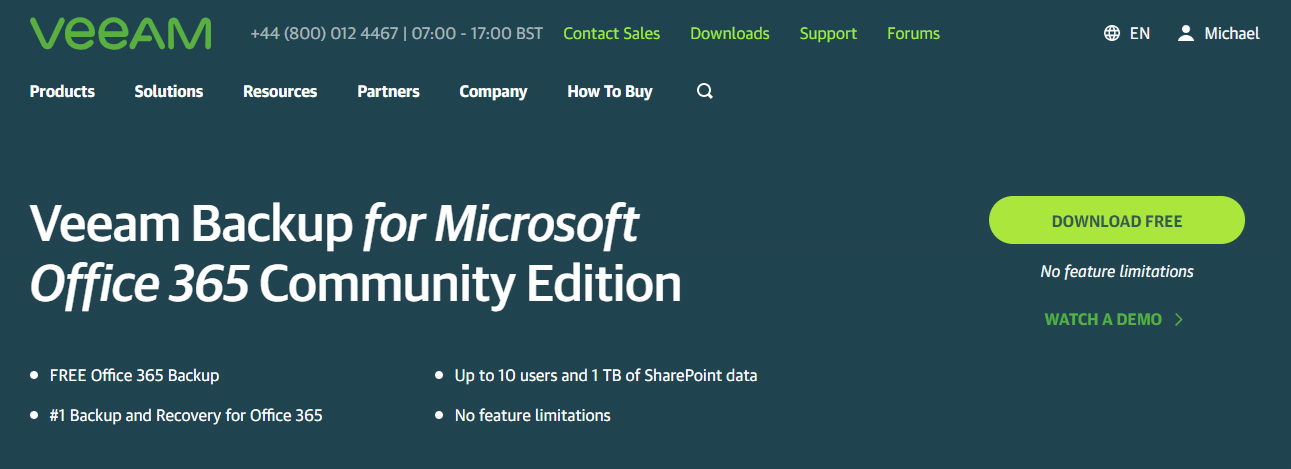
A lot of us will be running our own personal Office 365, and for that we still have you covered with our community edition, this is going to enable you to protect your Office 365 data to either disk or directly to object storage. You can find out more of that here.
Release Notes
There is so much more than what I have just mentioned here in this post but as always I think we do a great job of noting down all of the What’s New features and functionality in the new releases here.
Download
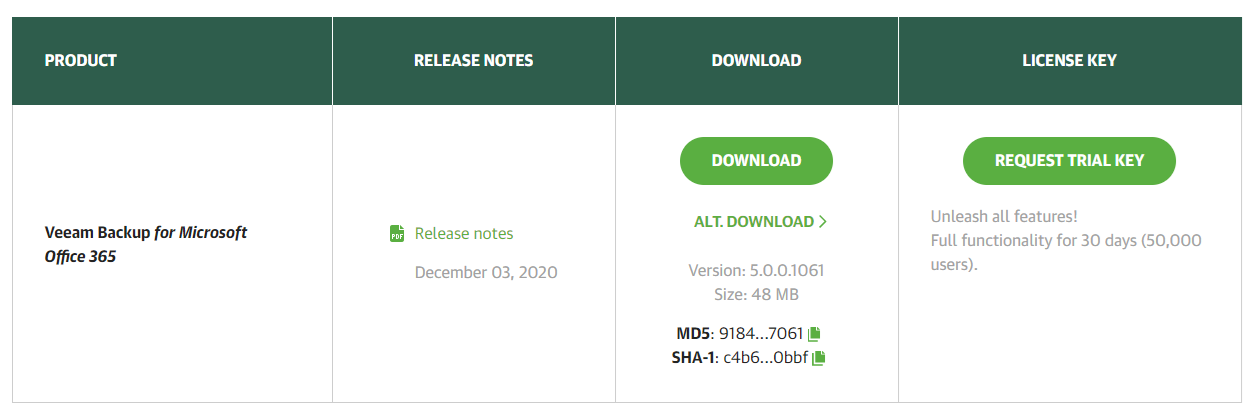
You can download the update or the whole install file by using this link
I will also be recording the update process with my current v4 version of Veeam Backup for Microsoft Office 365 to this latest version, just to highlight some of these new features but also how super simple and easy the upgrade process is. You will find that appear here on my YouTube channel and alongside the existing Veeam Backup for Microsoft Office 365 demos.
]]>And what if I told you, this has been around for years with Veeam Backup & Replication. Veeam have had this capability for a while now since 2016 in fact.
Primary use cases that we have seen have been,
Test and development
When you have the public cloud at your fingertips why not take advantage of it? Instead of having to purchase specific test and development environments. Also, perfect idea if you are looking to just see how certain apps and workloads are going to run in Microsoft Azure.
Data Migration
Let’s say you know where you are going and that is Microsoft Azure, how are you going to get those workloads there in a fast and efficient manner, Direct Restore to Microsoft Azure enables a fast way to restore those backups to the public cloud without compromising on keeping the restore points and more to the point the rollback is back to those production systems you also still have on premises.
Data recovery
We tend to talk about the bad failure scenarios, or we think nothing will happen to us and not really touch on the in between. What if you lost half your production virtualisation servers due to an outage of some description? What would you do? This feature within Veeam Backup & Replication enables you to restore some of your workloads from backups into Microsoft Azure you can then use an existing VPN or some other connectivity to join the environments and continue working or you could use VeeamPN to achieve this.
Walkthrough
In this YouTube video I walk through how easy and simple it is to get those image-based backups restored into Microsoft Azure as native Azure VMs for some of those use cases mentioned above. This also ties into the Veeam Backup for Microsoft Azure that was released this week.
Where should I run the conversion process?
I ran some tests for this one to determine for my lab where and what would be the best practice when it comes to restoring workloads into Microsoft Azure. Veeam offers a lot of choice when it comes to restore and how to assist when environmental challenges are in the way. Things like link speed to the public cloud due to location or other reasons for that. Also since the release of this feature back in 2016 there have also been many other enhancements and features added to Veeam Backup & Replication including the new Veeam Cloud Tier which gives us the ability to store our backups in Object storage, well we can also recover from those as well. This video linked below goes into more detail around where and what considerations you should take when looking to restore workloads to the public cloud.
Cloud Tier
It is only right that we have spoken about protecting native Azure VMs using the Veeam Backup for Microsoft Azure, we have spoken about getting your image based backups from either virtual or physical platforms that you have on premises or even in other public clouds to Microsoft Azure so I had to mention Cloud Tier or Capacity tier on how we can tier our backups or copy our backups into Microsoft Azure Blob Storage for either a long term retention or an offsite copy of your data.
Couple all these features together and we have a pretty dynamic and flexible way of being able to move data to from and within the public clouds.
If you have any questions or comments, feedback at all on the videos then please let me know either here in the comments, on the YouTube channel or on Twitter, a side note here is that I will be creating more video content over the next few weeks whilst we are stuck at home, I for one have been consuming a lot more of my news and education through YouTube and judging by the uptake in subscriptions I think you are too so let me know anything you want to see or for me to walk through.
]]>What is Veeam Backup for Microsoft Azure?
This new product focuses in on the Azure IaaS workloads you have running in the public cloud, much like the Veeam Backup for AWS edition that was released early this year, this product provides you the ability to protect those Azure VMs without having to install and agent on each one. It is a policy driven approach allowing for both snapshots and backups to be part of your data management plan when it comes to Microsoft Azure.
The product is a standalone solution that is deployable from the Microsoft Azure marketplace. A very easy to use wizard driven approach to configuration and management. Veeam Backup for Microsoft Azure Free Edition and subsequent versions are available within the Microsoft Azure Marketplace.
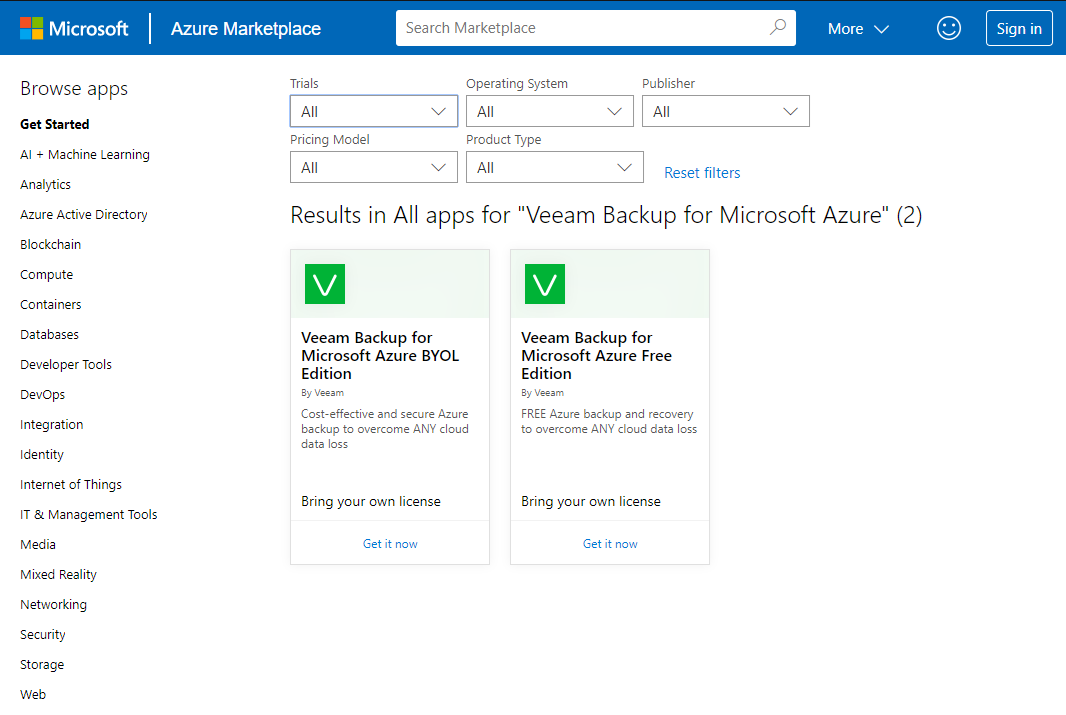
The FREE edition allows you to protect 10 Azure VMs using native snapshots and then tier those snapshots to an Azure Blob Storage repository.
Within the Azure Blob Storage Repository these backups are stored in the portable data format that sets Veeam apart from the other vendors in this space. This allows for the Veeam Backup & Replication External Repository feature to be leveraged and enables the ability to further additional data protection or allow for other tasks such as migrations or on premises data recovery.
As you would expect the offering also allows you to recover those Azure Virtual Machines not only back where they initially resided but also across accounts and even across regions. As well as being able to provide file level recovery for a more granular option.
Another cool feature is the ability to see a level of cloud cost, when you create your policies through the wizard driven approach you have the ability to start seeing some cost forecasting so you can make better decisions about your cloud cost consumption.
Policies, Workers & Protected Data
Those familiar with Veeam will notice a different approach to some of the key functions and naming, and maybe you can liken these new terms with those found in Veeam Backup & Replication they have some differences.
Those familiar with Veeam Backup & Replication will recognise Policies as something more commonly known as Backup Jobs, however even within Veeam Backup & Replication world we are seeing policies now entering the fold with the CDP policy coming in later releases.
Policies give you the ability to define several requirements when it comes to your cloud data management. But again, it is that same very easy to use wizard driven approach that all Veeam customers will be familiar with.
You can choose to protect everything in a region, or we can be granular on what to protect. An awesome feature here is that you can select either by Instance or by Tag. Tags really lend well to the fast-moving pace of Cloud Instances being spun up and spun down all the time. The ability to use tags means we can protect in a more dynamic fashion. We will demonstrate the ease of use and how dynamic these tags within Azure can be created and used for your data management needs.
I mentioned above about Snapshots and Backups and how they are used together in this product to provide the best of both worlds when it comes to fast recovery points but also an out of band copy of your data not linked to the original VM.
You may wish on some workloads to only provide Snapshots and some only backups, or both. Snapshot settings allows you to define when these will be taken and how many snapshots you intend to keep. Backup Settings is where we can define that Microsoft Azure Blob Storage repository in which we wish to store those backups to, this will also play the part of making that data visible if you wish to see that within Veeam Backup & Replication. You also have the same retention setting to define here.
The workers are configured during the configuration stage and setup of the Veeam Backup for Microsoft Azure. Those familiar with Veeam Backup & Replication could maybe liken these worker nodes to the Veeam Backup Proxy component within VBR.
The worker is a Linux based instance that is deployed and used when data needs to be transferred, the worker is used for both backup and recovery. When the policy is complete then the workers are shut down but remain in place for the next scheduled policy to take place.
Cost Estimations
A unique feature that is built into the Veeam Backup for Microsoft Azure free edition and will obviously include other versions is the ability to estimate cost when it comes to backups and storing the retention you have defined. This is something else we go into further detail within the video walk-through below.
As I have mentioned this post gives a very high-level overview of what you can find with the new product but if you would like to see more then I have created a walk-through below. Any comments please comment here, on the YouTube video or find me on twitter.
Let me know what you think to the YouTube walk-through’s it is something I am intending to really increase given that we are house bound and I have more time to create this content.
]]>DataLabs is a really strong and included feature set included for the most part in all versions of Veeam Backup and Replication and plays a huge part in the Veeam Availability Orchestrator product.
It serves so many purposes:
- Automated Backup and Replica verification using SureBackup & SureReplica
- OnDemand Sandbox from backups and replicas giving you the ability to offer out sandbox environments of that backup data to your security teams, data teams basically anyone that you want to give access to your data but you don’t want them impacting your production systems.
- OnDemand Sandbox from Storage Snapshots, this takes the above one step further, the ability to leverage data and workloads from an application consistent fast performant storage snapshot and in some cases on a secondary system in a secondary location gives that isolated sandbox a few more use cases.
- Ever wondered when restoring from a backup, if that backup could be infected with some malicious threat(s) or ransomware, there is Secure Restore to ensure that you are clean for the majority of the Veeam restore functions.
- The ability to inject a process into the restore process, for example if you need to remove someones data from a restore process because they have asked to be forgotten through GDPR or other regulation then you can ensure this happens via Staged Restore.
All of these are covered in much more detail in the three whitepapers listed below.
v10 also introduced further functionality within Veeam Backup & Replication to enable you to do more with your data. The above options for sandbox and automated testing require the full system to be powered up, we will use the backup storage or the storage snapshot to present the data into an isolated environment but in order for us to use this data we also need to run the operating system of the backup data which means we need compute resources in memory and CPU available to run.
in v10 the introduced functionality is called the “Data Integration API” this enables you to take all of your backed up disks only and present them to a location, the premise for this is that it removes the requirement of additional CPU and memory but it also enables for many different use cases on what you can do with this data.
- Data Classification
- Security / Scanning for vulnerabilities
- Analytics
- Understanding what data is being kept / duplication of data.
Niels has a great article here on the new Data Integration and a walkthrough on how to get going.
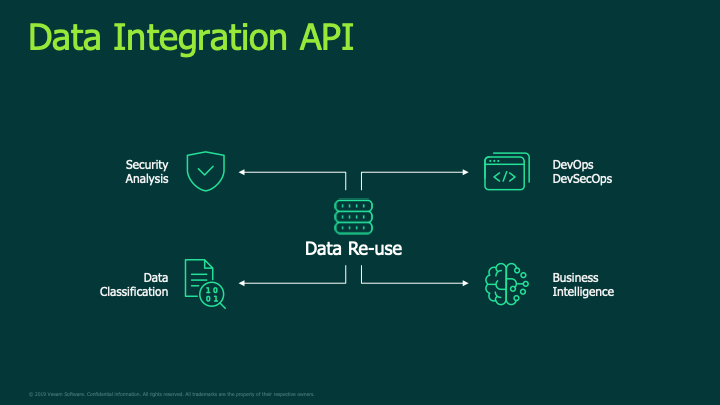
That’s just some of the examples I can think of at least.
Veeam DataLabs – VeeamHUB – PowerShell Scripts
What is Staged Restore and how you can use it?
Activate your data with Veeam DataLabs Part 1: Overview
Activate your data with Veeam DataLabs Part 2: Configuration
Activate your data with Veeam DataLabs Part 3: Alternate Use Cases
Activate your data with Veeam DataLabs – Webinar Session with Demos and Theory based on VeeamON 2019 session
]]>H1N1 Was The Last Pandemic. Here’s Why COVID-19 Isn’t Yet In That Category
I travel a lot for my work, in a global position my role requires me to be on a plane a lot and travelling to each corner. There is a mixed bag of travel for me, some of my travel is for customer and partner meetings but for the most part my travel is based around large IT conferences around the world. So far this year I have been to Shanghai, China in the first week back in 2019 (don’t worry I have had no symptoms of any cold or flu) then I have also been to Prague, Czech Republic and then also Atlanta, USA. Then I have had a huge block of being at home and no time on a plane.
What strikes me is the amount of conferences being cancelled due to the outbreak, I am not sure what happened in the IT industry going back to H1N1 in 2009 but now I am in this space its more visible.
As of today 29th February, Happy Leap Day people. The following events have been cancelled within our Industry.
- Mobile World Congress in Barcelona
- Facebook Global Marketing Summit in San Francisco
- Facebook F8 in San Jose, California
- EmTech, Asia in Singapore
- Google News Initiative Global Summit in Sunnyvale, California
- Shopify’s developer conference, Unite, in Toronto
- Game Developers Conference, in San Francisco on March 16-17
- F5 Agility – March 16-19, 2020 in Orlando
- Cisco Live Melbourne
- Cisco Marketing Velocity Summit in Austin
- CloudFest 2020
- T Systems International Portfolio & Partner Day on March 5th in Berlin
- Microsoft Ignite Zurich cancelled
- IDC Direction SANTA Clara March 3rd
Currently KubeCon which is due to be at the end of March in Amsterdam is still on with some good communication from the organisers, I know this because this is the next event I am supposed to be attending but as the numbers grow and grow this and many more events will likely be considered for cancellation.
Another swarm of events being cancelled are sales kick off events generally around the beginning of the year or at the end of the company financial year. These are generally not published online but you just have to look at your twitter feed and speak to peers within in the industry.
It’s not just the IT industry there are lots of other events that were scheduled that have also been cancelled.
This is also affecting where people work, and really opens the door for companies to have to keep their employees at home to function away from large shared workspaces to prevent and additional risk of exposure, companies like Zoom and other collaboration and remote calling software is going to be some of the vendors that will benefit from this outbreak. I think one thing that will come from this is how companies deal with this in the future, I can see more and more people being allowed to work from home.
Lots more events are also listed here – https://www.cnbc.com/2020/02/06/reuters-america-update-2-dozens-of-asia-trade-fairs-conferences-postponed-amid-coronavirus-fears.html obviously as you can expect the Asian and in general APJ/APAC events are going to be the first ones to be cancelled.
Update: I am in the market for a Nintendo Switch and those supplies already seem to be affected by the virus and supply chain. Just one article outlining some of the details that we could be coming up against in that supply chain across the globe.
I am going to open up the comments here and would love to keep the events list growing with any that you know of so we can keep people informed.
Keep safe people,
]]>How do you ensure if GitHub was down for a reason that your developers could still gain access to their code but also how many people actually run their code from GitHub directly into their environment?
Why do you need to backup GitHub?
As mentioned above if something was to happen to access to GitHub and that doesn’t just mean a site failure from that end it could also mean internet connectivity or issues within your environment which stops the ability to gain access to GitHub.
What if one of your developers or GitHub administrators brings down an important repository or makes a change that needs to be rolled back, this will also give you the ability to backup any other GitHub repository that you have watched or starred.
How did we get to this topic?
Well it was thanks to a couple of conversations but the trigger to actually exploring things more was having a quick chat with Ruairi McBride which then pushed me to go and do some digging which led me to some articles I will also mention as they could be useful.
The first resource I found was from Volkan Paksoy Volkan is a software developer so although approached this with backup in mind he also talks about some tools that are not the normal for us infrastructure people, but he covers things really well here. The bulk of the script I used actually is based on Volkans work I have just added some additional benefits to it.
Do I need to backup my GitHub?
My argument is how important is this code base, project work that you have within your GitHub account? Can you afford to lose it? Yes you most likely have a version of GitHub desktop running somewhere but what if mistakes occur? What if you lost that? Were compromised? If you feel like you should then there are lots of different scripts and open source tools out there as well as some paid for offerings that you can also use to create backups.
How can I start backing up GitHub?
As I have said there are many ways in which you can make this happen as with any backup methodology it’s down to what you want to achieve. I decided that as a test I wanted to create a daily backup of my GitHub repositories, I had no concern for space as I also know my Github only really contains PowerShell or code based repositories nothing with a huge size, I chose to take a full backup as it were on a daily basis
Having followed Volkans blog above where he states he already had GIT installed (Software Developers generally will have, in my case I did not) so this was the first step in order to start some level of backup.
Another resource to help with this –
https://www.atlassian.com/git/tutorials/install-git#windows
We then need to connect to your GitHub and this involves a few commands that can be found here but I will also print below.
Open a terminal/shell and type:
$ git config --global user.name "Your name here"

$ git config --global user.email [email protected]
Next we need to setup ssh on your machine, in my instance this machine is purely going to be a standalone machine that looks after this backup or other backup tasks this is not a developer machine or anywhere I will likely consume this source code we are backing up.
If you have not generated an SSH key for access to GitHub this resource will also help.
Connect GIT to your GitHub – https://kbroman.org/github_tutorial/pages/first_time.html
Not sure if this is needed but this helped me get some folder structure in place - git clone https://hostname/YOUR-USERNAME/YOUR-REPOSITORY
https://help.github.com/en/enterprise/2.18/user/articles/cloning-a-repository
Creating personal access token with Repo Scope – https://github.com/settings/tokens
How to then compress a group of files – https://docs.microsoft.com/en-us/powershell/module/microsoft.powershell.archive/compress-archive?view=powershell-6
create such public/private keys: Open a terminal/shell and type:
$ ssh-keygen -t rsa -C [email protected]
On windows you are going to find your required files here: C:\users\username\.ssh
- Go to your github Account Settings
- Click “SSH Keys” on the left.
- Click “Add SSH Key” on the right.
- Add a label “backup” and paste the public key from id_rsa into the text box
Then we can test if the above worked by running
ssh -T [email protected]
If that worked then you will get a return of
Hi username! You've successfully authenticated, but Github does

not provide shell access.
Ok so we now have GIT installed and we have now connected to our GitHub account. Next we are back to the Volkan page for the backup script. I have added some additional steps here as I want a point in time scheduled copy of my GitHub repositories that I can access if GitHub is not available or if someone is malicious within and deletes or edits my repositories.
#Script Original from https://volkanpaksoy.com/archive/2017/11/30/Backing-up-GitHub-Account-with-PowerShell/


#Define these four variables based on your own environment.

$backupDirectory = 'BACKUP LOCATION'

$backupretention = 'COMPRESSEDBACKUPLOCATION'

$token = 'GITUSERNAME:PERSONALACCESSTOKEN'

$base64Token = [System.Convert]::ToBase64String([char[]]$token)


$headers = @{

    Authorization = 'Basic {0}' -f $base64Token

};


Set-Location -Path $backupDirectory

$page = 1

$perPage = 30


Do

{

    Write-Host "Getting page: $page"

    $response = Invoke-RestMethod -Headers $headers -Uri "https://api.github.com/user/repos?page=$page&per_page=$perPage"


    foreach ($repo in $response)

    {

        $repoName = $repo.name

        $repoPath = "$backupDirectory/$repoName"


        Write-Host "Processing repo at path: $repoPath"


        if ( (Test-Path $repoPath) -eq 0)

        {

            Write-Host "Repo doesn't exist, clone it"

            git clone $repo.ssh_url

        }

        else

        {

            Write-Host "Repo exists, update"


            # Change to repo directory to fetch updates

            Set-Location -Path $repoPath


            git fetch --all

              #git reset --hard origin/master


            # Change back to root backup directory

            Set-Location -Path $backupDirectory

        }

    }


    $page = $page + 1

}

While ($response.Count -gt 0)


# Enable this command if you wish to store retention points for your GitHub repositories.


# The following commands will allow for us to take a compressed point in time version of our GitHub repository and assign the date to the compressed file and store to a relevant backup location.

# The Compress-Archive -Path <LOCATION> should be your GitHub repository location, this could also be used in conjunction with another script that on a schedule will bring down and update from the live GitHub repository to this landing area.

# The -DestinationPath should be the target location you wish your backups to reside and potentially then be further protected by your Backup Software.


Compress-Archive -Path C:\Backup\Github\ -CompressionLevel Optimal -DestinationPath ('$backupretention' + (get-date -Format yyyyMMdd) + '_GitHubBackup.zip') -force
This is what I have started to do on a scheduled basis so I have at least a copy of my scripts and work completed outside of GitHub, the next challenge is going to be restoring that back into GitHub. If anyone has that as a workaround then please let me know and I will add to this post.
]]>
We seem to be heading fast toward VeeamON 2019, this year our conference heads to Miami and none other than the famous Fontainebleau Miami Beach luxury hotel and resort. I have never been to Miami, so I am really looking forward to being there but also there is nothing quite like the VeeamON feeling and that of your own conference.

The conference officially runs from May 20th to May 22nd all in the same resort. But the fun actually starts on the Saturday for the die-hard techies heading out to Miami they will be starting their VMCE course that runs from Saturday to Monday before the conference kicks off with a welcome reception on the Monday evening.
We then have two full days of conference, breakout sessions and general sessions both of which I am going to get into more detail on later on.
Obviously, it wouldn’t be a Veeam conference if we didn’t have the famous Veeam party to close out the conference, pretty excited to see Flo-Rida perform.

My Breakout picks for the conference
We have I think 60+ breakout sessions this year, lots of technical content, business decision maker content, alliance content it’s a full-blown packed agenda of sessions and I have no doubt that everyone has put an enormous effort in to get the right content for the audience.
The length of the sessions are 45 minutes, I think this is a great move as this means the content needs to be on point and resonating with the audience but also not too long to lose interest. An attendee can hit 7 breakout sessions, so you have to choose carefully and plan your agenda accordingly with that in mind. Below are some of my picks.
There is an App for the event you can grab that will show all the other sessions and what else is happening during the event.
1. To Download the app, search for CrowdCompass AttendeeHub in the App Store or Google Play.
2. Once downloaded, search the app for VeeamON 2019 Miami event.
3. Log in to the VeeamON Event with the same First and Last name you used to register for VeeamON
I am pretty sure I won’t get to attend many of these sessions, unless I am presenting so anyone reading this, I would love an overview of the sessions you attend.
Day 1
10:20 – 11:05
Cumulonimbus – Cloud Tier Deep Dive & Best Practices – intrigued by what Cumulonimbus means but also the level of technical differentiation we have with our Cloud Tier feature that landed in the early part of 2019 is well worth seeing.
11:25 – 12:10
From the Architect’s Desk: Sizing of Veeam Backup & Replication, Proxies and Repositories – Now I have seen the presentation for this, and I know that this is going to get quickly get pretty technically deep, well worth the spot.
13:30 – 14:15
NetApp and Veeam: Deep Dive Into How Snapshots and Secondary Storage Can Help You Get More Out of Backup – This seems to be the Alliance 45 minutes, I am going to highlight the NetApp & Veeam story as one to attend, the end to end capabilities we have with NetApp is truly worth seeing.
Day 2
09:15 – 10:00
Activate Your Data with Veeam DataLabs – of course I am going to kick start day 2 with this one, and I will be making this one. I will be presenting on an end to end overview of Veeam DataLabs, what it is and how you can use it.
11:50 – 12:35
Now at this time there is a top-secret session and I cannot divulge what that is going to be about but that might be worth attending if there is room.
Architecture, Installation and Design for Veeam Backup for Microsoft Office 365 – This one will be a full on deep dive into Veeam offering with Office 365 and if this is your world or is going to be soon then it’s worth knowing how the parts fit together and how to architect VBO for your environment.
14:00 – 14:45
Veeam ONE 9.5 U4 Part 1: Monitor, Veeam Intelligent Diagnostics and Business View – Veeam ONE got a lot of love with the most recent release but it’s always been such a great product and really opens up the visibility into your whole environment not just your backup infrastructure.
Also, this slot has a session on Veeam Explorers another capability that is such a powerful differentiator and worth understanding some of the tips and tricks there.
15:05 – 15:50
Veeam ONE 9.5 U4 Part 2: Reporter, Heatmaps and Custom Reports – this is part two of the previous session so if that one got your interest then carry on listening to what can be done with Veeam ONE.
How I Stopped Worrying and Loved the Tape Media – There you go I have done it. I have suggested a tape session, and why not it’s still a massive strategy within many IT environments and still many require tape functionality this session will take a look into what Veeam is doing around Tape.
Technology General Session
The thing I want to close on is the Technology General Session where we will be live streaming out beyond the audience that are with us in Miami and we will be showing some technical demos. We then have an exclusive second half of the session where the stream will be turned off and we will share some of the futures that Veeam have coming later on in the year or sooner. This session will be live streamed from 15:30 Miami time.
With that I hope to see some of you there, if you are then don’t be shy and say hi, I will be the guy scrambling around between sessions and other matters probably wearing a funky vZilla t shirt or hopefully something if they arrive in time before I leave.
Hope you have a great VeeamON

Everything You Need to for Veeam Availability for Nutanix AHV
Now that we have our Veeam Proxy Appliance deployed, installed and configured, the next step is to start protecting some of the workloads we have sitting in our Nutanix AHV Cluster.
Navigate to the backup jobs tab on the top ribbon.
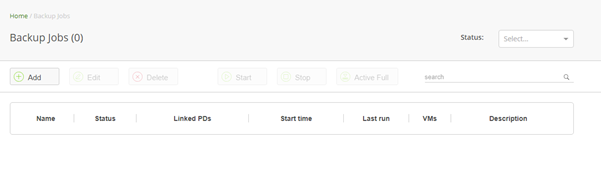
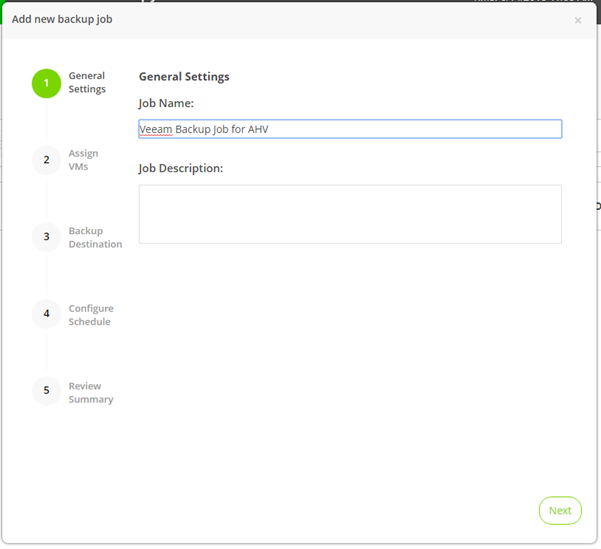
Here we can add a new backup job, a simple wizard driven approach to start protecting those workloads.
Next, we need to add in our virtual machines,
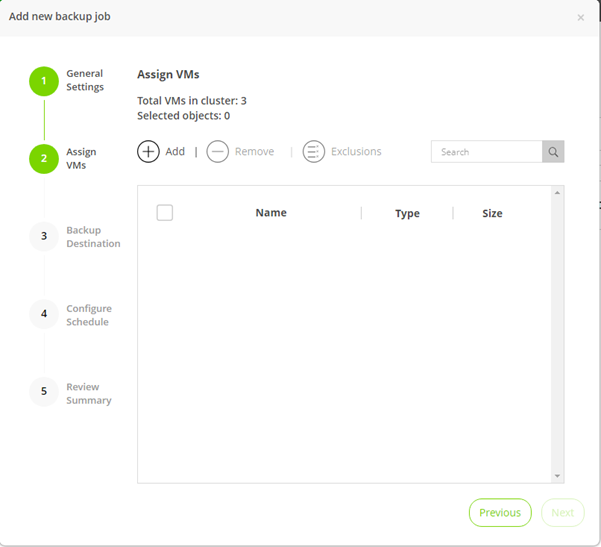
In my scenario I have simple virtual machines, if you are leveraging Nutanix Protection Domains then you can also leverage this grouping here to select your virtual machines, we can also leverage dynamic mode this is to allow the adding and removing of new workloads under that protection domain.
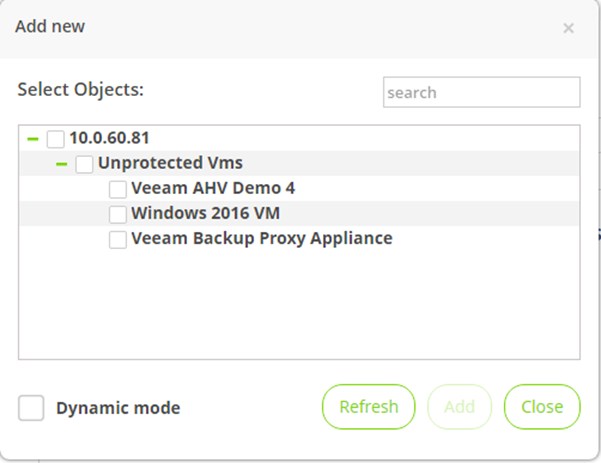
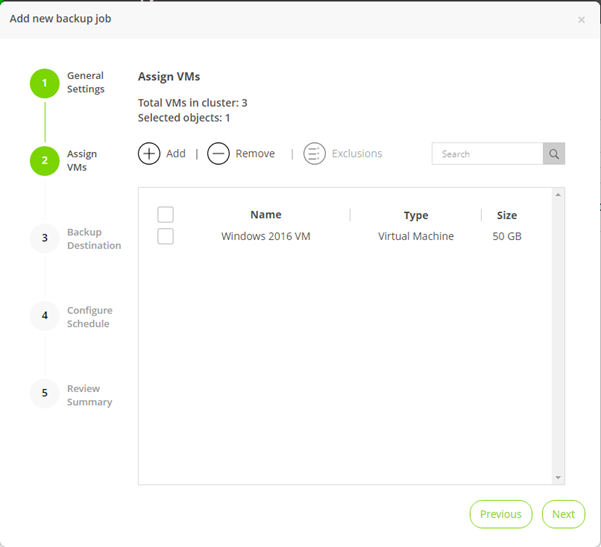
Add the virtual machine or machines that you wish to protect.
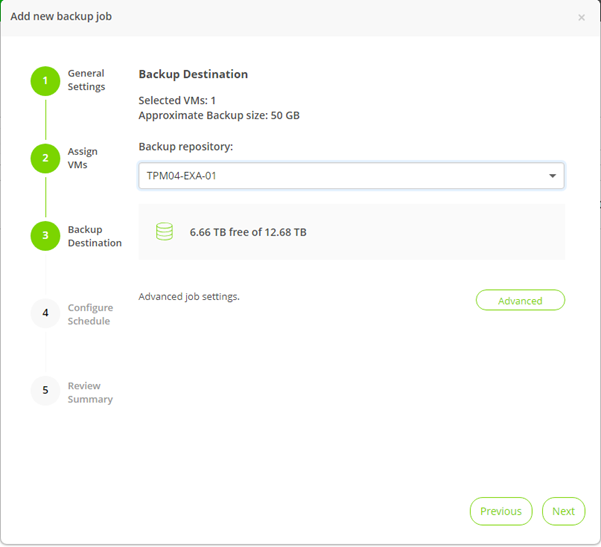
Next, the next option is selecting the destination of the backup job. To be able to see the backup repository the access on the VBR server needs to have the correct permissions to allow for access. This is done from the Veeam Backup & Replication console.
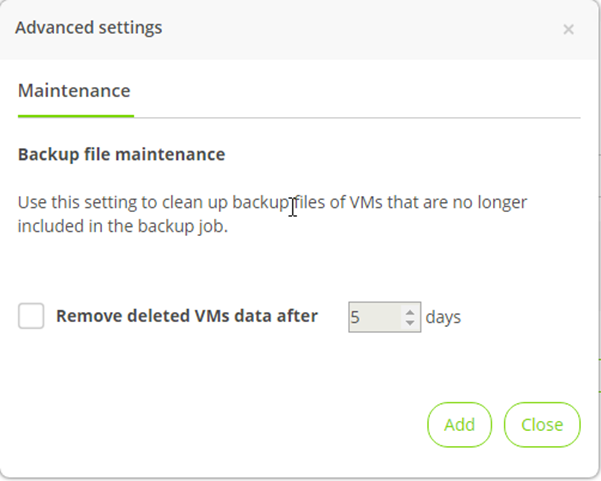
There are some advanced settings that can also be set to remove deleted VMs from the backup that are no longer included in the backup job.
The final step is to configure through the schedule. This will allow, you to choose the interim of backups and how many restore points that you must retain.
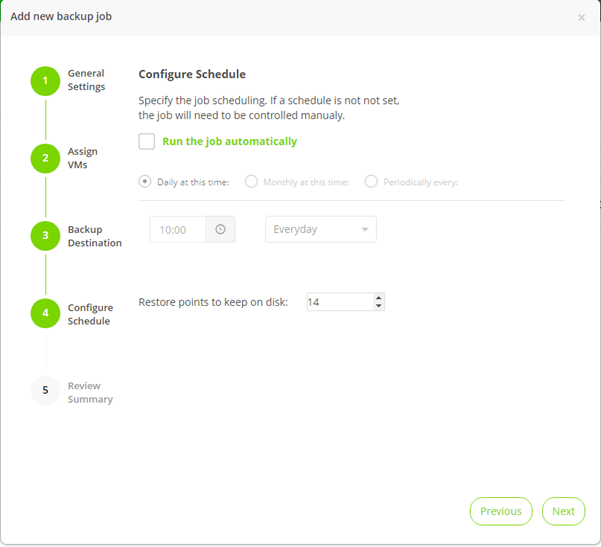
The final screen is the summary of the backup job you are about to complete.
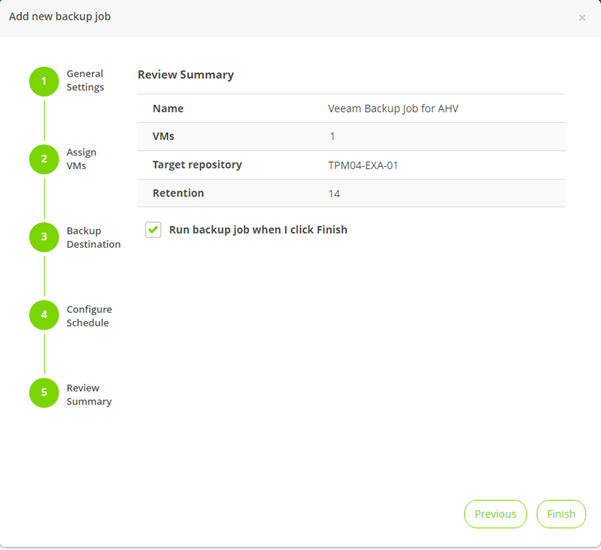
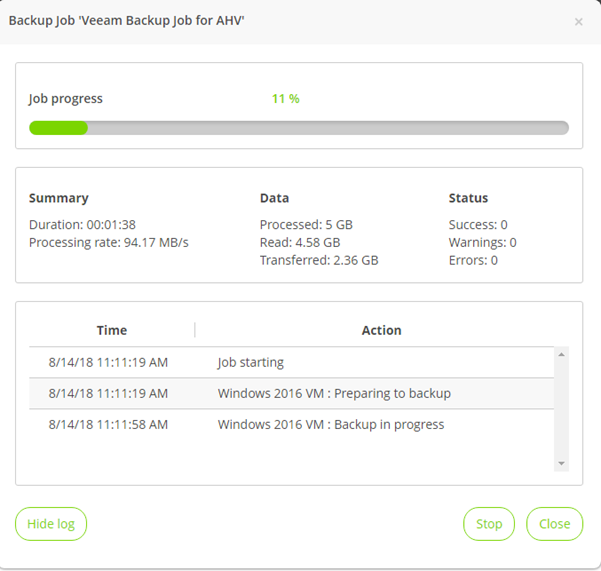
You will also notice the ability to run the backup job when finish is selected, this will then start the backup job process. This will trigger the backup job to perform a full backup of the virtual machines you have selected.
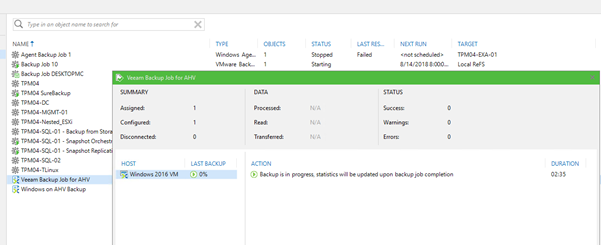
Over in VBR you can see the job also running. In a very similar fashion to what we saw with the original Veeam Endpoint backup, we see enough that something is happening, but nothing can be configured from this job within Veeam Backup & Replication.
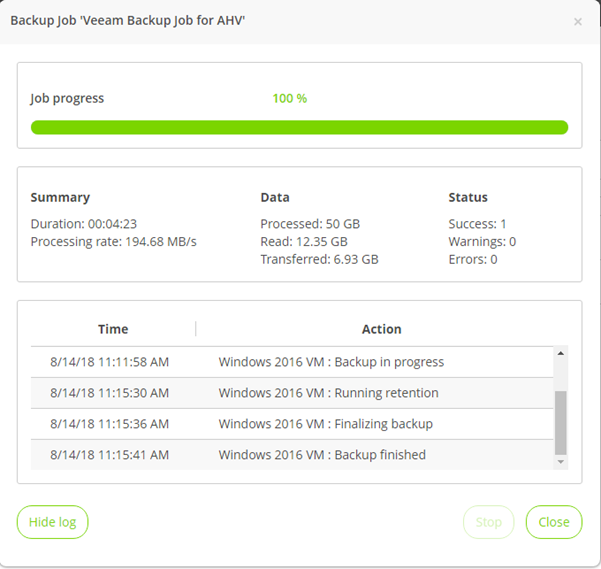
Back in the Veeam Availability for Nutanix AHV we now have a completed backup job.
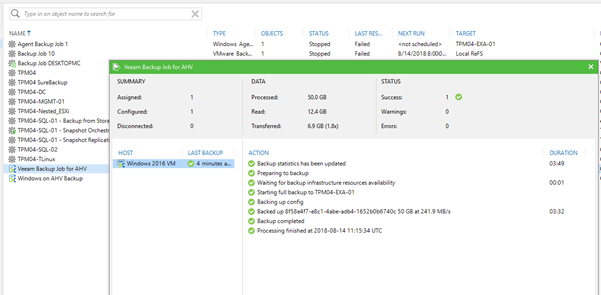
Veeam Backup & Replication also shows the completed job and the steps that have occurred during the job.
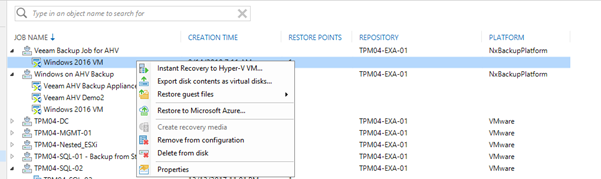
We will also now see the specific job in our Veeam Backup & Replication console under the backups giving us the ability to perform certain recovery tasks against those backup files.
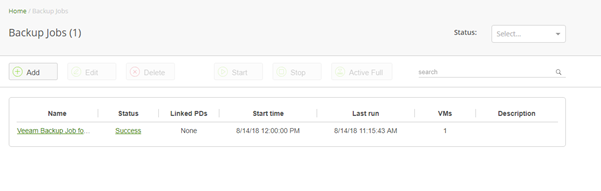
And we also see the completed job now under the backup jobs in the proxy appliance interface. Here we can perform an Active Full in an ad hoc scenario but also, we can start and stop the job and edit that job.
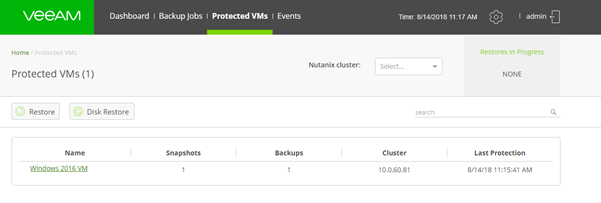
Over on the Protected VMs tab you will also notice that we now have visibility into the virtual machines that are protected with how many snapshots and backups are present.
To finish, if you head back to the dashboard you will now see the job status showing that we have one created backup job and it is currently idle.
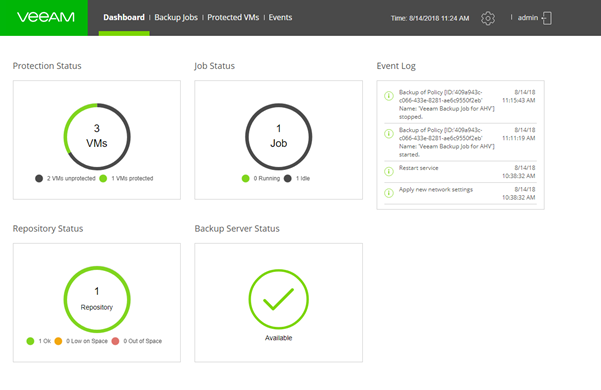
That’s all for the availability section of this series, this is really giving us the ability to create those backup jobs for the virtual machines that sit within the Nutanix AHV cluster, this is an agentless approach for any application consistency you will require the Nutanix Guest Tools.
One thing to note is if you have a transactional workload we would recommend using the Veeam Agent to provide not only the application consistent but also the log truncation within the application. Not required if you have an application that can manage that truncation task.
Next up we will look at the recovery steps and options we have.
]]>Everything You Need to Deploy Veeam Availability for Nutanix AHV
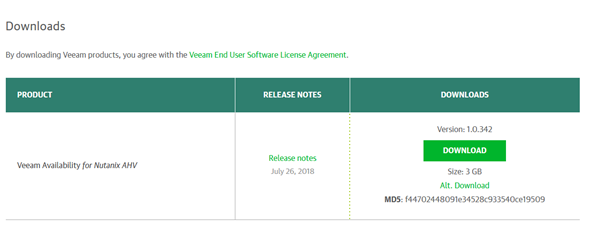
Download the latest version of Veeam Availability for Nutanix AHV from: www.veeam.com/availability-nutanix-ahv-download.html
These steps assume you have already had a Veeam Backup & Replication server configured. Navigate through the site to get the latest version available.
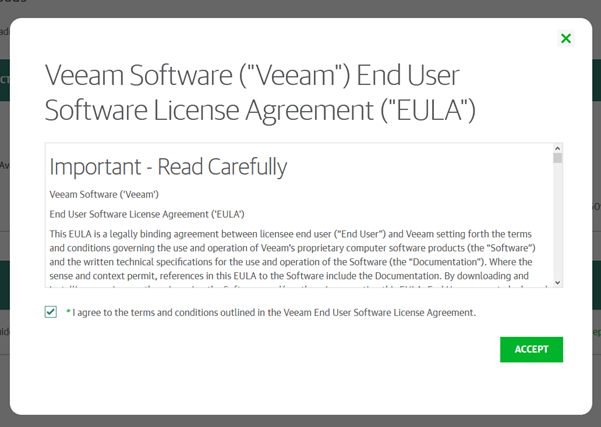
Accept the EULA.
You will then be prompted for login using your Veeam login credentials.
All the above is pretty standard for any downloads from Veeam.com, now we will get into the actual deployment into your Nutanix AHV cluster.
Once downloaded you need to extract the .vmdk file to a location accessible by the Nutanix AHV cluster.

Log in to your Nutanix AHV cluster, for the purposes of this walkthrough I am using the Community Edition but the process is the same in general for any hardware AHV cluster.
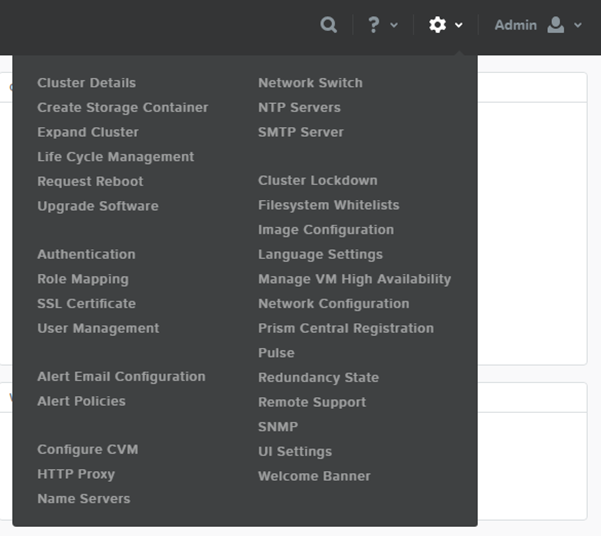
We need to take the VMDK disk and send this to AHV as an image, to do this we need to navigate to the settings button on the top right of the Prism interface and locate “Image Configuration”
A new window will appear, and you can then select Upload Image.
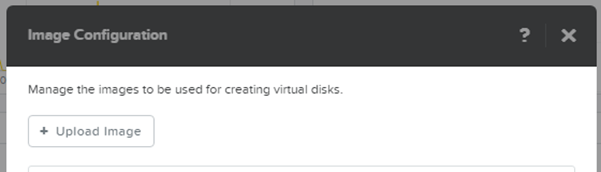
At this stage we can name the image something that allows you to recognize its purpose along with all other fields such as disk type and where you wish to upload the image to.
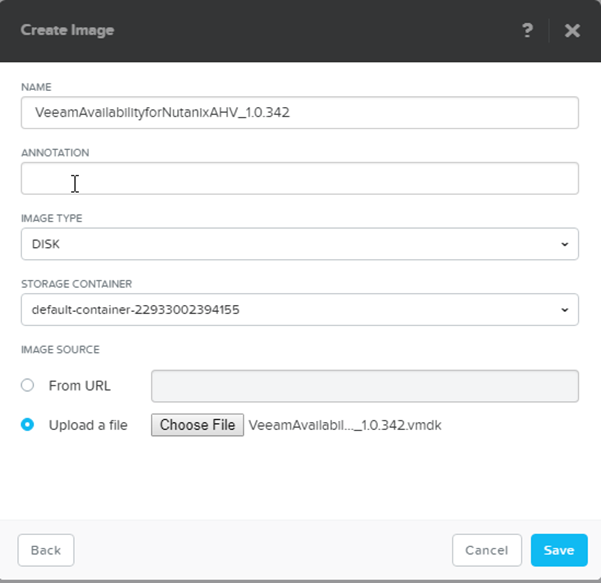
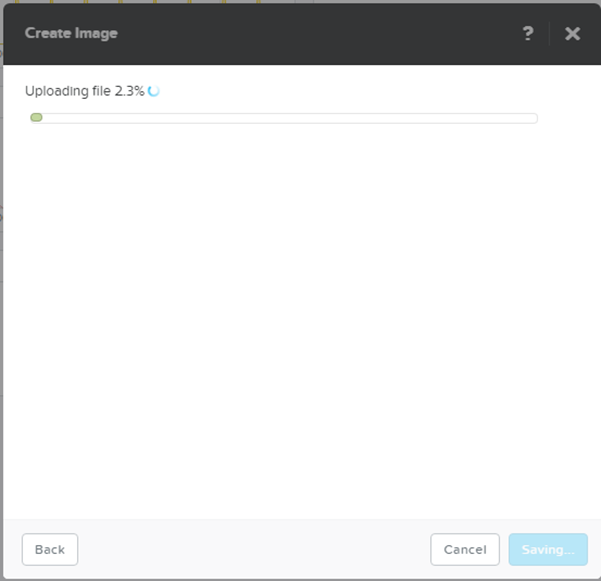
Upload from the file location you downloaded the vmdk to and save.
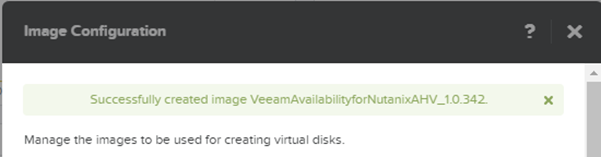
Now that we have the image we can create the Veeam proxy appliance from the image. Select create VM.
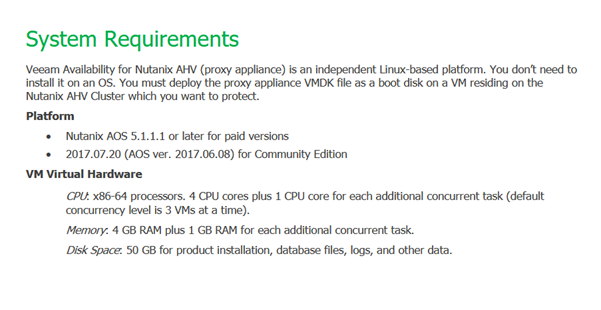
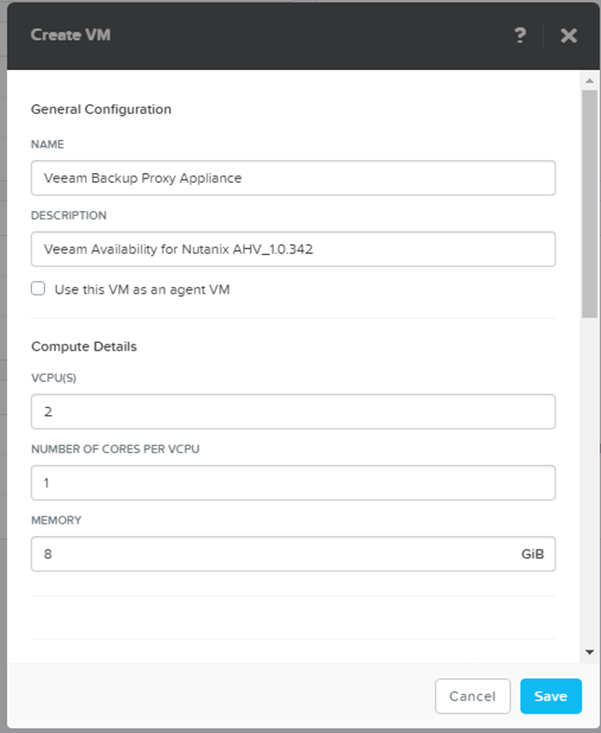
Create a VM with recommended parameters in the Nutanix AHV cluster that you wish to protect. As per the user guide you will find the system requirements for your proxy appliance. Also take note at those platform support versions.
Creating the VM is very easy and straight forward, we need a name and we need to determine what specifications we wish our VM to have.
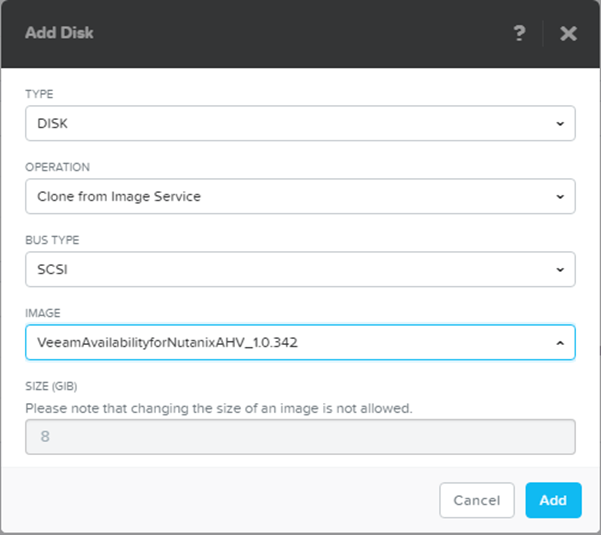
In the VM settings add a new disk from the image previously uploaded, the operation job down allows you to clone from the image service. Then under image you can select your recently uploaded Nutanix AHV VMDK
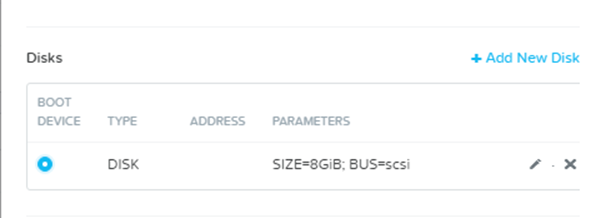
Once added you will also need to ensure that the disk is seen as a boot device, I have removed the CDROM drive from my VM configuration.
You should also add your network interface that has access to your Veeam Backup & Replication server for that communication between the Proxy Appliance and the Veeam Repository.
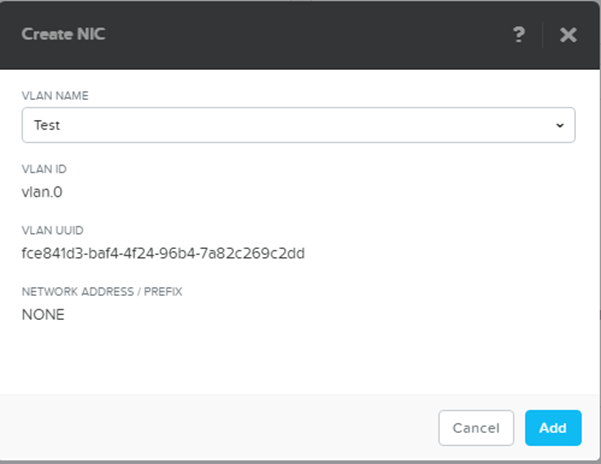
Once you have added the disk and configured the network then you select save.

Complete the setup by selecting save and then wait for the VM to be created and power on.
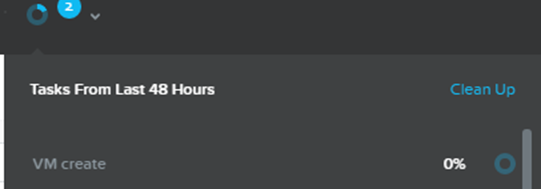

NOTE – Must have DHCP available on this network so that the system will pick up an available IP for management this can later be changed to fixed if required.
Once the VM is powered on within the VM console you will see the web console address, copy that full address and paste into a web browser.
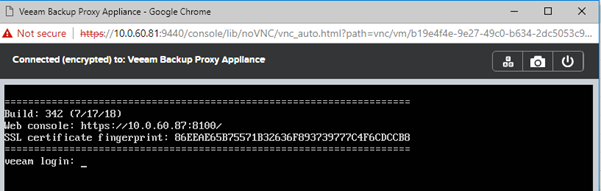
There you have it. You have successfully deployed and configured Veeam Availability for Nutanix AHV.
The following post will touch on the next steps and navigating the web interface that is exposed from this proxy appliance, the post will also touch on the installation phase.
]]>