
In the last three parts we covered, starting from scratch and getting the Kubernetes platform ready, this was using some old hardware and creating some virtual machines to act as my nodes. But if you don’t have old hardware but you still wish to build out your cluster then these virtual machines can really sit wherever they need to, for example, they could be in the public cloud but remember this is going to cost you. My intention was to remove all costs as possible as this system I am using is always running in my home network as it acts as my backup server as well as for tasks like this. We also covered how we got the Kubernetes cluster created using Kubeadm and then we started playing with some stateless applications and pods.
In this post we are going to start exploring the requirements around stateful by setting up some shared persistent storage for stateful applications. There was also something else I was playing with local persistent volumes and you can read more about that here on the Kubernetes Blog.
Stateful vs Stateless
Stateless that we mentioned and went through in the last post is where the process or application can be understood alone, there is no storage associated to the process or application therefore it is stateless, stateless applications provide one service or function.
Taken from RedHat: An example of a stateless transaction would be doing a search online to answer a question you’ve thought of. You type your question into a search engine and hit enter. If your transaction is interrupted or closed accidentally, you just start a new one. Think of stateless transactions as a vending machine: a single request and a response.
Stateful processes or applications are those that can be returned to again and again, think about your shopping trolley or basket in an online store if you leave the site and come back to the site in an hour site if the site is configured well then it is likely that this remembers your choices so you can easily make that purchase rather than having to go through the process of picking everything again into your cart. A good description I read whilst researching this was, think of stateful like an ongoing conversation with a friend or colleague on a chat platform, it is always going to be there regardless of the time between talking. Where as stateless, when you leave that chat or after a period those messages are lost forever.
If you google “Stateful vs Stateless” you will find so much information and examples, but for my walkthrough the best way to describe stateless is through what we covered in the last post, web servers and load balancers (stateless) to what we are going to cover here and the next post around databases (stateful) there are many other stateful workloads such as messaging queues, analytics, data science, machine learning (ML) and deep learning (DL) applications.
Back to the lab
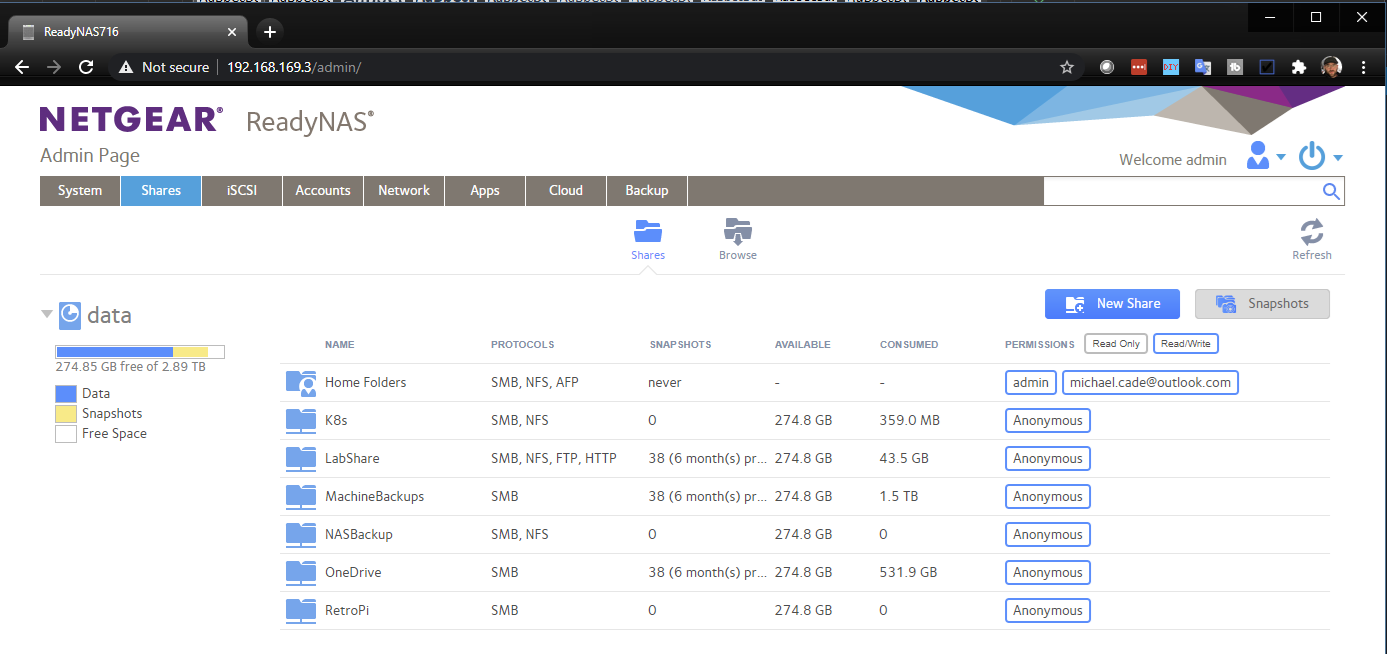
I am running a NETGEAR ReadyNAS 716 in my home lab that can serve both NAS protocols (SMB & NFS) and iSCSI. It has been a perfect backup repository for my home laptops and desktop machines, and this is an ideal candidate for use in my Kubernetes cluster for stateful workloads.
I went ahead and created a new share on the NAS called “K8s” that you can see on the image below.
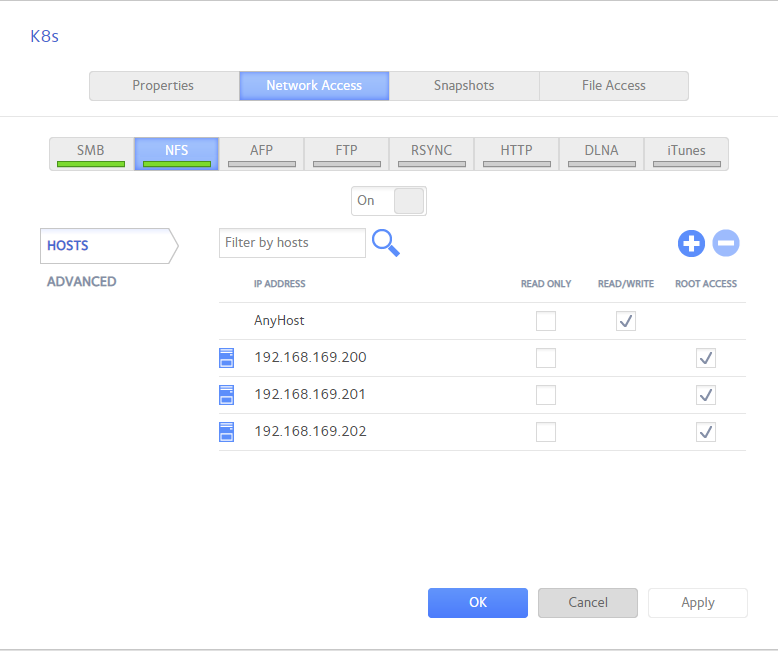
I then wanted to make sure that the folder was accessible over NFS by my nodes in the Kubernetes cluster
This next setting had some strange issues until I found out how this was affecting what we were trying to achieve. Basically, with this default setting (root squash) this was causing issues where persistent volumes could be created but then additional folder structure or folders could not always be created it was very sporadic although the same each time we tested.
Root squash is a special mapping of the remote superuser (root) identity when using identity authentication (local user is the same as remote user). Under root squash, a client’s uid 0 (root) is mapped to 65534 (nobody). It is primarily a feature of NFS but may be available on other systems as well.
Root squash is a technique to void privilege escalation on the client machine via suid executables Setuid. Without root squash, an attacker can generate suid binaries on the server that are executed as root on other client, even if the client user does not have superuser privileges. Hence it protects client machines against other malicious clients. It does not protect clients against a malicious server (where root can generate suid binaries), nor does it protect the files of any user other than root (as malicious clients can impersonate any user).
A big shout out to Dean Lewis here who helped massively get this up and running. He also has some great content over on his site.
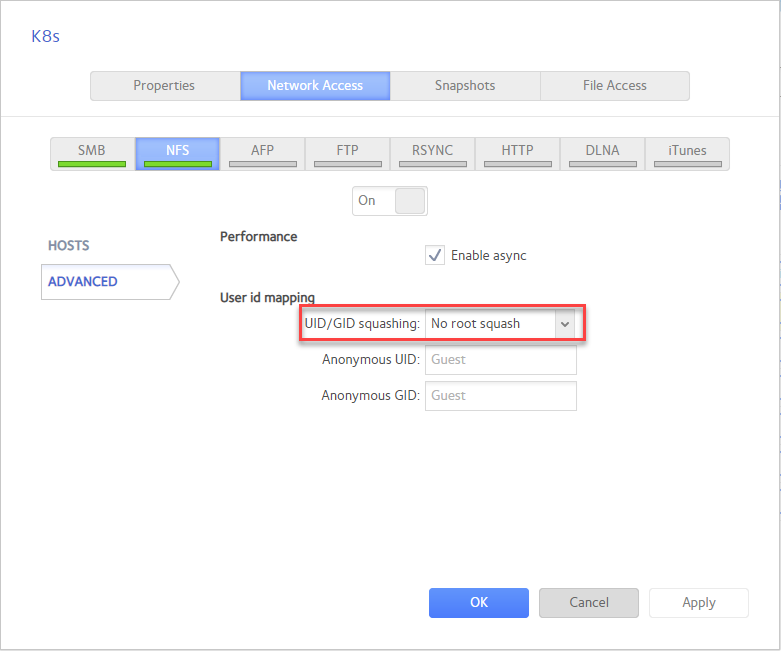
I also enabled SMB so that I could see what was happening on my Windows machine during some of the stages. This is also how we discovered the first issue when some folders were not being created, we then created them, and the process would get that step further so that No Root Squash setting is super important.
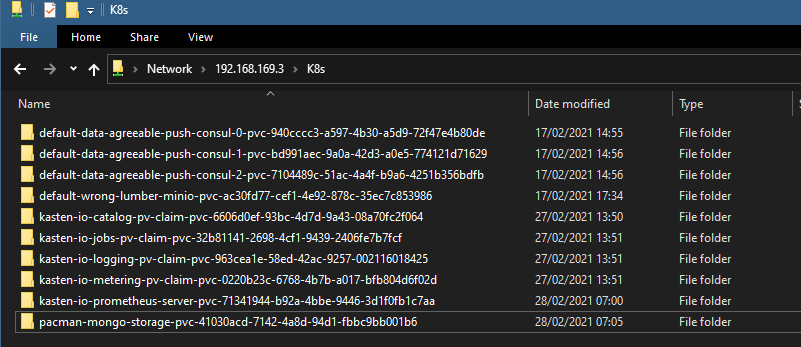
Kubernetes – NFS External Provisioner
Next, we needed an automatic provisioner that would use our NFS server / shares to support dynamic provisioning of Kubernetes persistent volumes via persistent volume claims. We did work through several before we hit on this one.
The Kubernetes NFS Subdir external provisioner enabled us to achieve what we need to be able to do for our stateful workloads with the ability to create those dynamic persistent volumes. It is deployed using a helm command.
Note – I would also run this on all your nodes to install the NFS Client
apt-get install nfs-common
helm repo add nfs-subdir-external-provisioner https://kubernetes-sigs.github.io/nfs-subdir-external-provisioner/
helm install nfs-subdir-external-provisioner nfs-subdir-external-provisioner/nfs-subdir-external-provisioner \

 --set nfs.server=192.168.169.3 \

 --set nfs.path=/data/K8s
kubectl patch storageclass nfs-client -p '{"metadata": {"annotations":{"storageclass.kubernetes.io/is-default-class":"true"}}}'
Now when we cover stateful applications you will understand how the magic is happening under the hood. In the next post we will look at helm in more detail and also start to look at a stateful workload with MinIO.
1 Comment