I have recently been testing and working through some scenarios where I require the NFS client on a Windows machine to access some NAS shares over the NFS protocol, not much has changed I believe between Windows Server 2016 and Windows Server 2019 but thought it might help some to see how easy it is to get going.
I am picking up at this stage with my fully patched and ready to go Windows Server running 2019. As mentioned previously I want to use this machine to access my NFS share which doesn’t matter what it is or what it is for but this Windows machine is running in Microsoft Azure and I am access Azure NetApp Files over the NFS protocols, Azure NetApp Files can be presented over both NFS and SMB and I will have additional posts about this later.
Installing the Client for NFS
I am pretty sure this could also be achieved through the system manager and selecting the Add Features dialog and working through the wizard approach, I have been purposely doing a lot more of my tasks through PowerShell so that I can re-use and make my tasks quicker, this is something I have picked up from my learnings around Infrastructure as Code. For that reason, I am using PowerShell. I am sure someone else had documented the process through the system manager and UI.
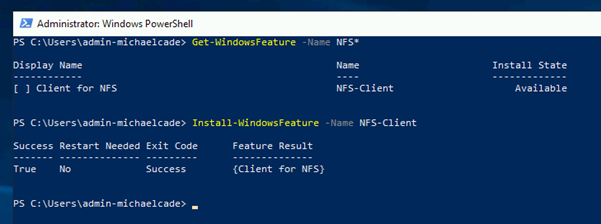
First of all, let’s see what NFS based features we have available to us by running the below command.
Get-WindowsFeature -Name NFS*

As you can see from the image above, we have one feature available to us, “Client for NFS” by installing this it will allow us to mount NFS exports to our Windows machine so we can access the data within.
To install this feature run the following command.
Install-WindowsFeature -Name NFS-Client

That’s it, it’s that simple, hardly not worth mentioning. That’s the NFS Client installed on our machine, next we need to make sure from the NAS server point of view that the IP address of this windows machine can access that data.
As I said before I am using Azure NetApp Files, this export is configured in the following screen when configuring Azure NetApp Files. I will provide a step by step walkthrough of this process after this initial post.

As you can see from the above, I have allowed all clients from all subnets using the export policy (This is the default setting for ANF), my advice is that if this was production you should to create more secure export policies.
Mounting the share
Now we have our NFS Client and we have our export policy from whichever NAS device you are looking to mount onto your Windows, next we actually need to mount the share for use.
Some people will ask now, why you are using NFS when you can use SMB, certain applications, certain environments may require this method and protocol. If this was a traditional Windows environment and this share was going to house predominately user shares and home drives, then absolutely the way to do this would most likely be with the SMB protocol.
Next up is open up a command prompt with Administrator privileges, the mount command is going to be the command you use and then you will be using the NAS IP Address followed by the share name and then which letter you would like to mount this to on your Windows system.
Mount 10.1.1.4:/vZillaANFShare n:

Providing you have the correct configuration, mostly down to the export policy on your NAS device then this process should take seconds. And then by seeing the success message as per above but then checking this now as a mapped network drive as per below.

Quick post hope that it is useful for somebody. This was something I was working on so that I could test Azure NetApp Files without access to Azure Active Directory services (due to corporate policy) this stopped me from being able to use SMB but allowed me to test the functionality via NFS on Windows and Ubuntu.
Justin Parisi did a great blog on this at the start of the year – Windows NFS? WHO DOES THAT???

This document is not correct because windows didn’t allow to mount nfs shsre even after enable the nfs-client hence please guide with yhe correct documentation l.
Please share more detail to what you are not seeing with this walkthrough? These are the exact steps taken on my system and then documented.
Hi. I followed your steps and for the most part they worked. I am using OpenMediaVault as the NFS Host and it required me to add ipaddress:/export/SHARE… Hope this will help someone else. On another note. I restarted Server 2019 and the mount was gone. How would I be able to mount the drive on startup?
Thanks
To keep it persistent you can use Task Scheduler…
1. Open Task Scheduler and create a new task, make it run as the System account (switch from domain to local when choosing and it’ll check names verify).
2. Under triggers choose At startup.
3. Actions: New: Start a program.
Program: mount
Add arguments: x.x.x.x:/export/SHARE X:
4. Unmap if already mapped, run the task manually and verify it works, then reboot to test.
* Verified on Server 2019 and a Synology.
i tried this, connected every reboot but in windows explorer always showing the drive icon is disconnected
ho to create actions for point no. 4 ?
Brandon in the last comment supplied the steps to make this change persistent.