Veeam Replication – Advanced features and functionality
Welcome back, as we move through this series where we have touched on the basic replication configuration, or I should say the easy to use deployment, the walkthrough and some more advance configurations or ways in which to achieve the same outcome from PowerShell commands.
This post will hopefully share some of the more advanced features, options or even some of the outcomes you might not be able to find any detail on.
Remote replica from backup
The clue is in the title, this gives the ability to create a replica VM from a backup that has already traversed the WAN or already resides on that secondary location. This method has some benefits in that it will not have to touch the production estate and you obviously do not need to send the data twice if you have a backup copy configuration to the same site. More information can be found here –
https://helpcenter.veeam.com/docs/backup/vsphere/replica_from_backup.html?ver=95
Low Connection Bandwidth
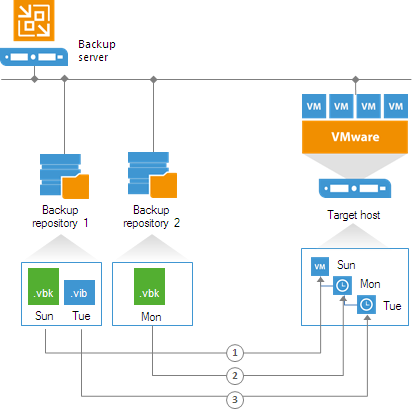
Another option when creating your replication job was “Low Connection Bandwidth” Introducing Replica Seeding, this is the ability to use the man in the van bandwidth. Poor links between sites or large datasets then if possible take advantage of seeding. This could be used in some cases for getting replicas to our cloud connect providers.
Basically, if you have a backup for the replicated VM on the backup repository located in the DR site. You can point the replication copy job to this backup. The first run of the replication job will seed the data from the backup file, i.e. it will create a VM replica image, once complete it will resync with the production VM for any changes since the backup file. Notice how it only does that seed once where as remote replica continues to use that same method.
Giving a shout out to Luca here on his blog a while back he wrote about seeding to a service provider (Cloud Connect – https://www.virtualtothecore.com/en/seeding-veeam-cloud-connect-part-3-replication-jobs/)
Separate Virtual Networks
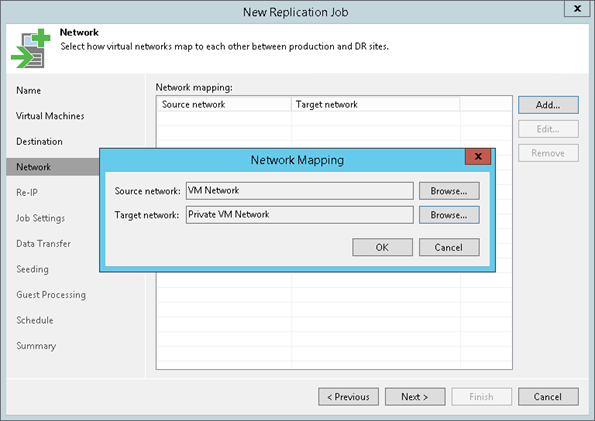
Not really an advanced setting as such but something I should cover here, if your target environment does not use the same networking, this setting allows you to map the production (source network) and the secondary (target network)
Calculating Digests
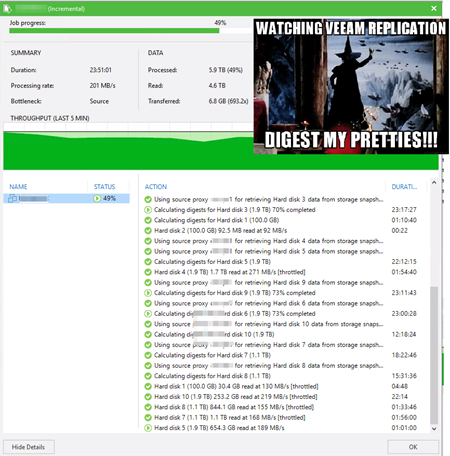
For those of you already running Veeam replication you may have seen this, let’s cover what this process is and what do we expect to see from a calculation point of view. This task is checking the difference between the source VM and the target VM (Replica VM)
A good rule of thumb here is 1GB per minute, just bare that in mind when you are calculating how long your replication jobs are going to take.
Why does this happen? Well you are probably going to know why this is happening but just to run through some of them.
Most commonly it’s if you change something on that source VM, add a disk for example probably the most common update or change here and there is very little you can do to avoid this then wanting to calculate the digests during the job.
You will also find this message in your job log if you reinstall vCentre or something happens to your vCentre and something changes your VM IDs. Datastore disconnections could cause it, oh and my favourite is if you remove the source VM from the inventory and then re add it back in. it’s going to get a new VM ID and that’s also going to prompt for this process.
There is very little we can do with the above scenarios but sit it out, although if you find that something is outside of those timeframes then a call to support might be worth the clarification of the setup.
This job running at the moment from @HammondRhys shows what can happen if you run out of space on the repository which is used for that replication metadata another use case or fail case for the calculating digests.
Different IP addressing Scheme
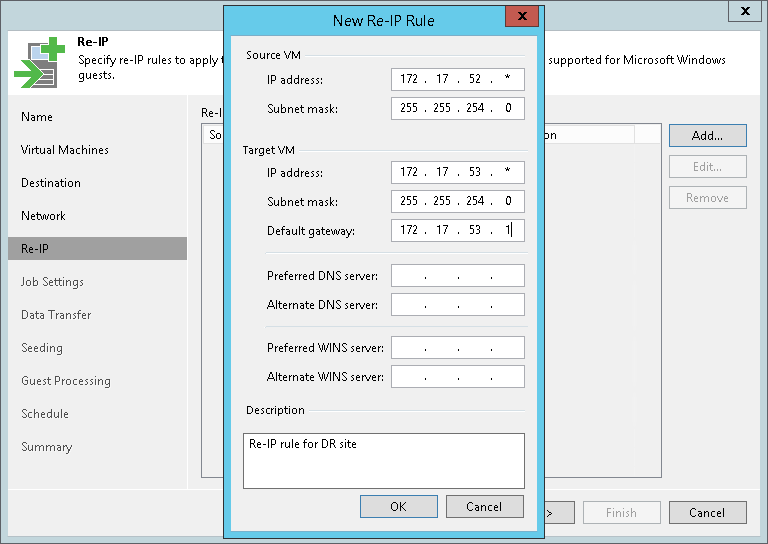
More common that not these days is the requirement for different IP addressing in a secondary location. This exact setting or configuration is available as part of the Veeam replication wizard.
By setting this different IP addressing scheme when a failover plan is triggered it will apply these different addresses to the replica VM.
A big note here is that this is only applicable to Windows virtual machines.
Storage Integration Settings
I touched on this very briefly in the transport modes post but wanted to touch again on an example of when this setting needs to be considered.
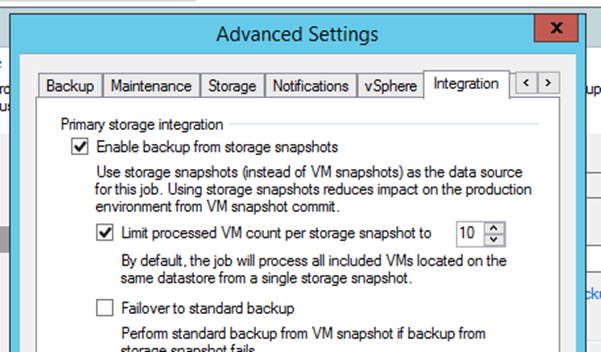
When configuring such large jobs, it is advised to configure the maximum number of VMs within one storage snapshot. The setting is available in the advanced job settings within the Integration tab.
Example: When creating a job with 100 VMs and setting the limit to 10, the Backup from Storage Snapshot job will instruct the job manager to process the first 10 VMs, issue the storage snapshot, and proceed with the backup. When that step has successfully completed for the first 10 VMs, the job will repeat the above for the following 10 VMs in the job.
Replica Metadata
Finally, and I know this post is now getting on the long side but given some recent conversations I wanted to add at least something in here that may help when it comes to metadata location and sizing.
The latest information I can find is from one of our product managers. Outlining a good rule when it comes to sizing for metadata space.
“Typical metadata size can be calculated as 128MB for each 1TB of VM data (per each replica restore point).”
Next post we will touch on the WAN Accelerator options and benefits.


